Man Cave Sign
This project was the final project for the DIY Design and Manufacturing course I took as a masters student at Carnegie Mellon. For this project we were free to choose, design, and build our own unique object. The only restrictions were that the project is fun to own and use and it is of practical scale.


Inspiration
In recent years neon and LED signs have become an extremely popular accessory not only for businesses but also for personal use. Neon and LED signs provide amazing atmosphere for many different situations and applications and they are really fun to incorporate into an interior design plan. As lighting technology has improved the different styles, options, features, and accessories associated with neon and LED signs have become limitless. However, with all these advancements comes a dramatic increase in price, especially if you want something custom made. I have always wanted custom signage for my apartment but haven’t been able to find a solution that has the options I am looking for that also is affordable. This desire presents a great opportunity for the final project for this class.
Design Choice
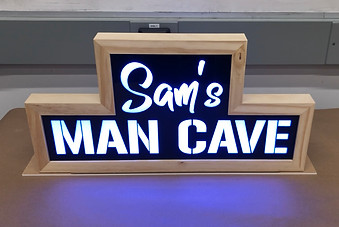
After a lot of consideration I chose to design and build an acrylic edge lit LED sign for my future Man Cave that I will create when I have my first condo or house. I want the LEDs to be RGB so I can make the sign change colors, I want the acrylic to be etched to capture the light glow, and I want the frame to be made of wood for the pure aesthetics of the material.


Designing The Sign
With the overall concept in mind it is time to design the style of the sign. I chose to make a "top hat" like outline with two different fonts for the lettering. The font used for my name is Remaglide and the font used for "Man Cave" is Gunplay. I used CorelDRAW to create my design and made sure to leave extra room around the words for the frame lip that will be discussed in a later step. The small peg like extremities on the top and bottom edges of the outline were created to give space for the LED strips to sit on top of and below the acrylic pieces.
Designing The Frame
The frame for this sign is made out of wood. I chose to use pine wood because it's low cost, easy to work with, and resistant to decay. I went with miter cut edges for all the frame corners because I think it looks nicer and gives the frame a more professional feel. I also planned in an inner and outer groove to the sign frame that can more clearly be seen in the pictures. The inner groove acts as a lip to hold the pieces of acrylic from falling out the front of the frame. The outer groove was created to give the illusion of my sign floating off the wall once mounted. All the pieces of the frame were first created in Solidworks and then assembled together in a simulation to insure all the dimensions were correct.


Cutting The Frame
With the frame designed it is now time to actually create these pieces. I first used the table saw to cut strips of wood to the correct starting size for the frame pieces. I then made dado cuts in each strip to create the grooves previously discussed. After the strips had all the proper grooves in them, I used the miter saw to cut the pieces to the proper length and create 45 degree angles on all the ends. Finally I used the belt sander to refine all the edges so I would get a really tight and crisp fit when attaching the pieces together.
Gluing The Frame
Now that all the frame pieces are ready, it is time to glue them together. Usually this can be done all at once with one strap corner clamp because most miter frames are just four pieces that create a box. However my frame had eight pieces and two internal corners that would collapse under external pressure. Therefore I needed to glue my frame together in sections being really careful to properly align each piece so the final glue job would close off the shape correctly. I decided to break my frame off into two separate sections and then once those two sections dried I joined them together to create the final frame.


Cutting And Etching The Acrylic
The next step in this project was to cut and etch my acrylic pieces. I have three pieces of acrylic for this sign. The first piece is a black stencil piece and I created this to give better contrast between the letters and the background of the sign. The next piece is clear acrylic, and this is the piece that has the etching on it to capture the LED glow. During this project I learned that there are two different kinds of acrylic, cast and extruded. Etching only works on cast acrylic and I figured this out the hard way by trying to use extruded acrylic first. I did over a dozen different tests playing around with the speed and power level of the laser until I finally found the combination of settings that gave me the best look. The last piece of acrylic I used was a white sheet just for the outline of the sign. This piece was created to hide the electronics in the back of the sign, add additional contrast to the letters, and help reflect the LED light forwards.
Electronics
For my sign I chose to go with 5050 RGB LEDs. They came with a control box and IR remote and had the cutting feature so custom lengths could be achieved. After cutting strips to the correct lengths I soldered on wire leads so I could get power to the lights. I created a small custom perf board that has multiple channels to connect the light strips to as well as a connection point for the light controller. This gives me the flexibility to change either the controller type or light strip type in the future if I want.


Integration
All the components of my sign are now complete and it's time to put everything together. The acrylic sheets get stacked on top of each other and dropped into the word frame and the LEDs get placed in the small slots that were designed at the top and bottom of the sign. I also made a support piece that screws into the back of the sign. This support piece holds the acrylic sheets in place and provides a mounting point for the LED controller.
Final Project Results:
Here are the results of all my hard work!